
The printer drum unit often hides in plain sight—essential but rarely noticed until something goes wrong. Many people confuse it with the toner cartridge, assuming they do the same job. But while the toner holds the powder that creates the image, the drum unit is the reason your prints come out sharp and clear instead of smudged or faded.
Think of it as the bridge between digital files and the physical page. Without a functioning printer drum unit, even the most expensive printer and high-quality toner can deliver disappointing results. Whether you run a small home office or manage printing for a busy workplace, understanding this single component can save you money, prevent downtime, and keep every page looking professional.
What Is a Printer Drum Unit?
A printer drum unit is a critical component in laser and LED printers that transfers the toner powder onto paper to create the final printed image. While the toner cartridge stores the fine powder used for printing, the drum unit ensures that this powder lands in the right places with the right intensity. Without it, even the best toner can’t deliver a sharp or clean print.
Unlike inkjet printers that spray liquid ink directly onto the paper, laser printers use a complex process involving static electricity and heat. The drum unit plays the starring role here—it holds an electrostatic charge that attracts the toner, and then presses it onto the paper before the fuser unit permanently bonds it with heat. This is why a worn-out drum unit often results in faded prints, streaks, or other quality problems even when your toner cartridge is full.
Many people mistakenly believe the drum unit and toner cartridge are the same thing because, in some printers, they come as a single combined unit. In reality, they perform separate functions, and knowing the difference helps you troubleshoot printing issues more effectively.
How a Printer Drum Unit Works
Understanding how a printer drum unit works helps explain why it’s so essential for producing clean, professional-quality prints. While the process happens in seconds, several precise steps occur inside the printer before a blank sheet of paper turns into a finished document.
Let’s break down the process into simple terms.
Basic Printing Process Explained
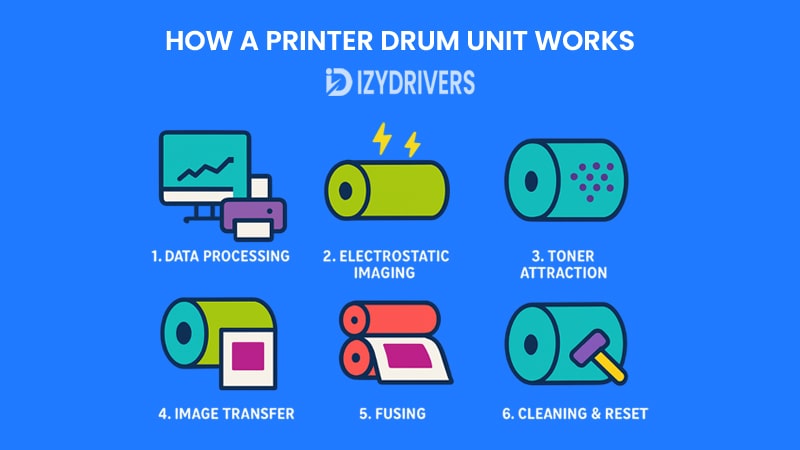
Inside every laser or LED printer, the printing process begins when your digital file is sent to the printer’s internal memory. The printer then converts this information into a language it can understand—often PostScript or PCL—before the laser (or LED array) draws an electrostatic image onto the drum unit’s surface.
Toner particles, which are negatively charged, cling to the positively charged areas of the drum unit, forming a perfect powder-based mirror of the page you want to print. When the paper moves through the printer, the drum unit rolls across it, transferring the toner in exactly the right places. Finally, the fuser unit heats and presses the toner permanently onto the paper, completing the process.
This entire sequence happens rapidly, often within seconds, but every step relies on the drum unit performing flawlessly.
Relationship Between Toner and Drum Unit
The printer drum unit and toner cartridge work closely together but have completely different roles. The toner provides the pigment, while the drum unit ensures accuracy and consistency when placing it on the page. If either one fails, print quality suffers.
For example, replacing the toner won’t fix faded or streaky prints if the drum unit is worn out. Conversely, a new drum unit won’t help if the toner cartridge is nearly empty. Maintaining both components properly ensures optimal print quality and avoids unnecessary downtime.
Printer Drum Unit Workflow: Step-by-Step Printing Process
| Step No. | Workflow Stage | What Happens in the Printer Drum Unit Process | Key Components Involved |
|---|---|---|---|
| 1 | Data Processing | Printer converts digital file into printable format (e.g., PostScript, PCL). | Printer Memory, Controller |
| 2 | Electrostatic Imaging | Laser or LED creates an electrostatic image on the drum unit surface. | Printer Drum Unit, Laser/LED Array |
| 3 | Toner Attraction | Toner powder adheres to the charged areas of the drum unit, forming the page image. | Toner Cartridge, Printer Drum Unit |
| 4 | Image Transfer | Drum unit rolls across paper, transferring the toner image onto the sheet. | Printer Drum Unit, Paper Feed System |
| 5 | Fusing | Heat and pressure fuse the toner onto the paper for a permanent print. | Fuser Unit, Heat Roller, Pressure Roller printer |
| 6 | Cleaning & Reset | Drum unit cleans leftover toner for the next print cycle. | Printer Drum Unit, Cleaning Blade |
Types of Printer Drum Units
Not all printer drum units are built the same. Depending on the printer model and how the manufacturer designs its components, drum units can be either integrated with the toner cartridge or exist as a separate, replaceable part. Understanding these differences helps you make better maintenance and cost decisions.
Let’s look at the most common types of printers drum units found in modern printers.
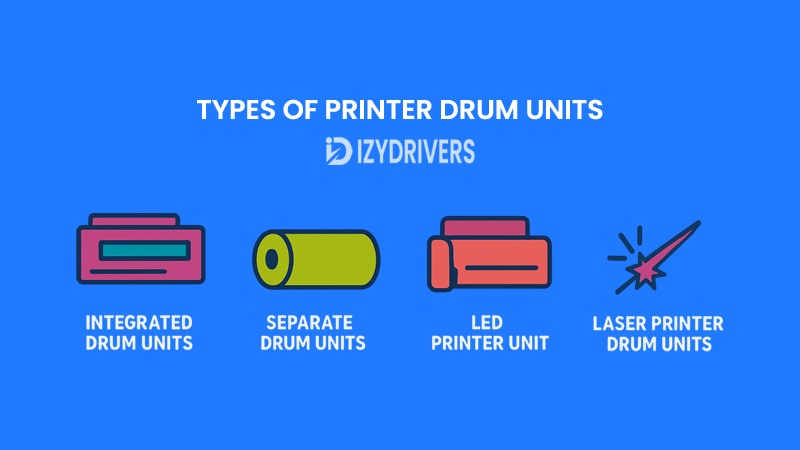
Integrated Drum Units
Some printers combine the toner cartridge and the drum unit into a single piece. This design makes replacement straightforward—when the toner runs out or print quality declines, you simply swap out the entire unit.
The advantage here is convenience. There’s no need to troubleshoot whether the issue lies with the toner or the drum unit; replacing both solves most quality problems at once. However, this design can be more expensive in the long run since you might be replacing a perfectly good drum unit just because the toner cartridge is empty.
Separate Drum Units
Other printer models keep the printer drum unit independent from the toner cartridge. In these designs, the drum unit typically lasts much longer than a single toner cartridge—sometimes up to three or four toner replacements before it needs to be changed.
This approach can be more economical because you only replace the drum unit when it actually wears out. However, it also requires users to pay closer attention to print quality, since they’ll need to identify whether fading or streaking is caused by the toner or the drum unit itself.
Laser & LED Printer Drum Units
While the basic function remains the same, laser printer drum units and LED printer drum units differ in how the image is written onto the drum. Laser printers use a single laser beam and moving mirrors to draw the image, while LED printers rely on a stationary array of light-emitting diodes.
This distinction doesn’t significantly affect maintenance or replacement, but it can influence print speed and reliability in some models. LED printers, for example, have fewer moving parts and may require less servicing over time.
Comparison of Different Types of Printer Drum Units
| Type of Drum Unit | Description | Advantages | Disadvantages | Typical Usage Scenario |
|---|---|---|---|---|
| Integrated Drum Units | Toner cartridge and drum unit combined into a single replaceable unit. | Simple replacement process; no troubleshooting needed. | Higher long-term cost as both parts are replaced together even if one is still functional. | Home printers or small offices needing minimal maintenance. |
| Separate Drum Units | Drum unit and toner cartridge are independent components. | Longer drum lifespan; lower replacement cost since toner and drum can be replaced separately. | Requires attention to print quality to detect when the drum unit needs replacement. | Offices with higher printing volumes seeking cost savings. |
| Laser Printer Drum Units | Uses a laser beam and moving mirrors to draw the image on the drum unit’s surface. | Proven technology; high print accuracy. | Slightly more moving parts; potentially higher maintenance needs over time. | Businesses requiring detailed, high-quality prints. |
| LED Printer Drum Units | Uses a stationary LED array instead of a moving laser beam to write the image on the drum unit. | Fewer moving parts; potentially faster printing; less maintenance required. | Limited to certain printer models; may be less available in some markets. | Offices prioritizing speed, reliability, and low upkeep. |
Signs Your Printer Drum Unit Needs Replacement
Even the most durable printer drum unit has a limited lifespan. Over time, wear and tear can cause print quality to decline, no matter how much toner you have left. Recognizing the early warning signs can help you avoid wasted paper, frustrating downtime, and unnecessary costs.
Here are some clear indicators that it’s time to replace your printer drum unit.
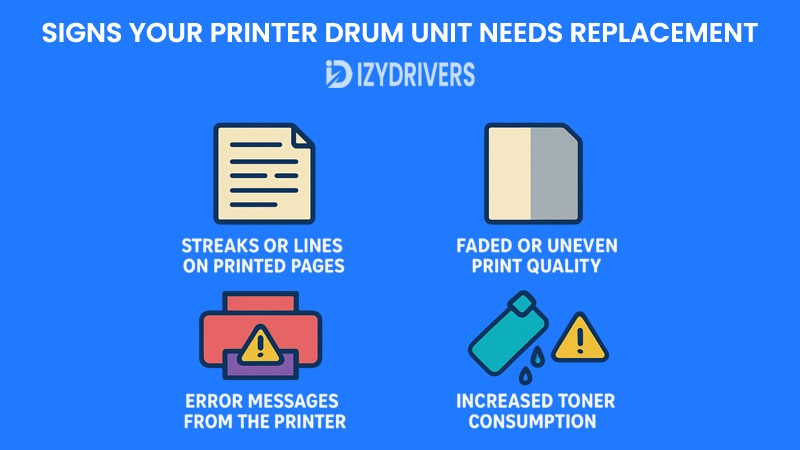
Streaks or Lines on Printed Pages
One of the most common signs of a failing drum unit is the appearance of vertical or horizontal streaks across your printed documents. These lines often occur when the drum’s surface becomes scratched, worn out, or contaminated with leftover toner particles.
If replacing the toner cartridge doesn’t fix the problem, the drum unit is usually the next thing to check. Continuing to print in this condition only wastes paper and makes documents look unprofessional.
Faded or Uneven Print Quality
When the printer drum unit can no longer hold an even electrostatic charge, toner particles may not stick properly. This leads to faded text, uneven shading, or entire sections of the page appearing lighter than others.
You might notice this happening gradually over time rather than all at once. Replacing the drum unit typically restores crisp, consistent output almost immediately.
Error Messages from the Printer
Many modern printers have built-in sensors that track the lifespan of the drum unit. When it reaches its expected page count limit, the printer may display a message such as “Replace Drum” or “Drum Life End.”
While you can sometimes continue printing for a short while, ignoring this warning often results in a rapid decline in print quality and can even damage other components in the printer.
Increased Toner Consumption
A worn-out drum unit can make your printer use more toner than necessary because it fails to transfer toner efficiently to the page. This not only drives up printing costs but also creates extra waste.
If you find yourself replacing toner cartridges unusually often without a corresponding increase in printing volume, the printer drum unit may be the real culprit.
How to Replace a Printer Drum Unit
Replacing a printer drum unit may sound complicated, but most modern printers are designed to make this process straightforward. Knowing how to do it yourself can save time, money, and the hassle of unnecessary service calls.
Below is a step-by-step guide to replacing your printer drum unit safely and correctly.
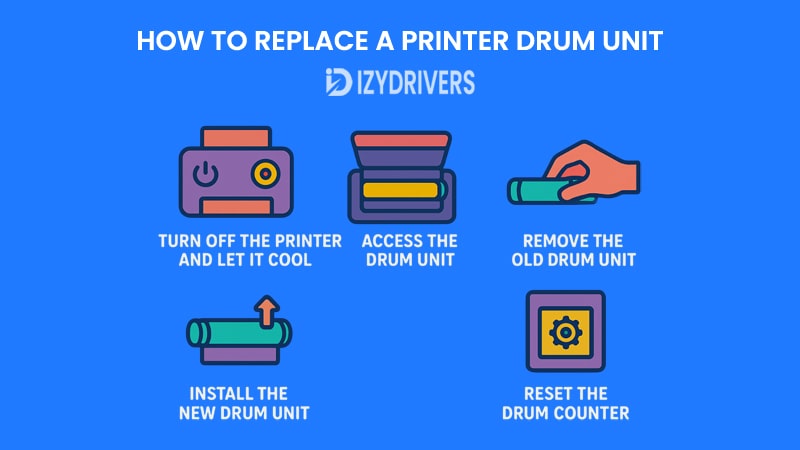
Step 1: Turn Off the Printer and Let It Cool
Before touching anything inside the printer, always power it down and unplug it from the wall. Many parts, especially around the fuser, can be extremely hot right after printing. Giving the printer a few minutes to cool prevents accidental burns and ensures safety.
This step also reduces the risk of damaging sensitive components by eliminating any chance of static electricity while handling the internal parts.
Step 2: Access the Drum Unit
Open the front or top cover of the printer, depending on the model. Most printers have a clearly labeled area for the toner and drum assembly. Pull out the entire assembly carefully so you can work on it outside the machine without rushing.
At this point, you’ll see whether your printer uses a combined toner-and-drum unit or a separate drum unit that can be removed independently.
Step 3: Remove the Old Drum Unit
If your printer uses a separate drum unit, release it from the toner cartridge by pressing the designated lever or button. Carefully set the toner aside because you’ll likely reuse it unless it’s also empty or near the end of its life.
Handle the drum unit by its edges and avoid touching the shiny green or blue roller surface. Fingerprints or scratches on this surface can lead to permanent print defects.
Step 4: Install the New Drum Unit
Unpack the new printer drum unit and gently shake it a few times to evenly distribute any internal toner coating, if applicable. Align it with the toner cartridge and lock the two pieces together following the printer’s instructions.
Once reassembled, slide the entire unit back into the printer until it clicks into place. Make sure everything is seated properly before closing the cover.
Step 5: Reset the Drum Counter
Many printers require a manual reset of the drum counter after installation. This tells the printer it now has a fresh drum unit and helps maintain accurate maintenance alerts. Instructions vary by model, so check your printer’s user manual or on-screen menu for the correct procedure.
After resetting, run a test print to confirm that everything is working properly and the print quality has returned to normal.
Pros and Cons of Printer Drum Units
Like any printer component, the printer drum unit comes with its advantages and disadvantages. Understanding both sides helps you plan maintenance schedules, manage costs, and avoid unexpected printing problems.
Let’s break it down clearly so you can decide whether replacing or upgrading your drum unit is the right move at the right time.
Advantages of Printer Drum Units
One of the biggest benefits of a printer drum unit is its role in producing sharp, high-quality prints. Because the drum unit controls how toner is transferred onto the page, it directly affects text crispness and image clarity. A well-maintained drum unit ensures professional-looking documents every time.
Another advantage is its durability. Separate drum units, in particular, often last through several toner cartridges before needing replacement. This can reduce long-term costs compared to systems where the drum and toner are combined in a single unit that must be replaced all at once.
Finally, a dedicated drum unit allows for more precise troubleshooting. If print quality declines, you can easily identify whether the issue comes from the toner or the drum unit itself rather than replacing both unnecessarily.
Disadvantages of Printer Drum Units
On the downside, printer drum units eventually wear out, and when they do, print quality can deteriorate quickly. Replacing them requires some basic technical knowledge and a bit of care to avoid damaging sensitive parts inside the printer.
Another drawback is cost, especially if your printer uses combined toner-and-drum cartridges. In such designs, you often replace the drum even if it hasn’t reached the end of its life, leading to higher running expenses over time.
Lastly, maintenance reminders from the printer might be ignored by some users, causing them to continue printing with a worn-out drum unit. This can lead to wasted paper, wasted toner, and sometimes even damage to other printer components.
Summary Pros and Cons of Printer Drum Units
| Aspect | Pros (Advantages) | Cons (Disadvantages) |
|---|---|---|
| Print Quality | Produces sharp, clear, and professional-quality prints when well-maintained. | Declining quality with streaks or faded prints as the drum unit wears out. |
| Durability | Separate drum units can last through multiple toner cartridges before needing replacement. | Combined toner-and-drum designs force replacement even if the drum is still in good condition. |
| Cost Efficiency | Longer lifespan lowers long-term printing costs by reducing frequent replacements. | Initial replacement cost can be high for some models, especially combined units. |
| Troubleshooting | Easy to diagnose whether print issues come from toner or drum unit with separate designs. | Requires technical care during replacement to avoid damaging sensitive printer components. |
| Maintenance Awareness | Dedicated units allow better tracking of wear and replacement cycles. | Ignoring maintenance alerts can lead to wasted toner, paper, and possible printer damage. |
Printer Drum Unit vs Other Print Components
Many printer owners confuse the printer drum unit with other parts like toner cartridges, fuser units, or even printer drivers. While all of these components work together to produce the final printed page, each one plays a distinct role. Knowing the differences helps you troubleshoot problems effectively and maintain print quality.
Let’s look at how the printer drum unit compares with the key components inside a printer.
vs Toner Cartridge
The most common confusion is between the printer drum unit and the toner cartridge. The toner cartridge contains the powdered toner that creates the text and images on the page. The drum unit, on the other hand, transfers this toner to the paper using electrostatic charges before the fuser permanently bonds it with heat.
In short, the toner provides the “ink,” while the drum unit ensures it’s placed precisely where it should be. A failing toner cartridge may cause faded prints, but a failing drum unit often leads to streaks, smudges, or uneven text clarity.
vs Fuser Unit
While the printer drum unit handles transferring toner to paper, the fuser unit comes into play immediately afterward. The fuser uses heat and pressure to melt the toner particles onto the paper, making the print permanent.
If prints are smudging after they leave the printer, the problem is often with the fuser rather than the drum unit. However, both components need to be in good condition for consistent, professional-quality results.
vs Printer Drivers
It’s easy to mix up physical components with software terms like printer drivers. The printer drum unit is a hardware part inside your printer, while printer drivers are software programs on your computer that translate print jobs into a language the printer understands, such as PostScript or PCL.
Even if your drum unit is in perfect condition, a corrupted or outdated printer driver can cause print errors or prevent jobs from printing correctly. Both hardware and software must work together smoothly for error-free printing.
Printer Drum Unit Maintenance Tips
Keeping your printer drum unit in good condition not only improves print quality but also helps reduce long-term printing costs. A well-maintained drum unit can last through multiple toner cartridges before it needs replacement, saving both money and time.
Here are some practical maintenance tips to help extend the life of your printer drum unit.
Keep the Drum Unit Clean
Over time, toner dust, paper fibers, and other debris can accumulate on the surface of the printer drum unit. This buildup can lead to streaks, smudges, or faded prints. Regular cleaning prevents these issues and ensures every page comes out sharp and professional.
Most manufacturers recommend using a soft, lint-free cloth or a specialized drum-cleaning tool. Avoid touching the drum’s shiny surface with bare hands since fingerprints can damage its delicate coating and affect print quality.
Store Printer Supplies Properly
If you keep extra toner cartridges or drum units on hand, storing them correctly is essential. Exposure to direct sunlight, heat, or humidity can shorten the lifespan of these components. Always store them in a cool, dry place, ideally in their original packaging until you need them.
Proper storage also prevents accidental scratches or contamination on the drum unit’s surface, which could reduce print quality once installed.
Use High-Quality Toner and Paper
The printer drum unit works best when paired with the right toner and paper type. Low-quality toner may not adhere properly to the drum, leading to uneven prints and premature wear. Similarly, using paper that’s too rough can damage the drum’s surface over time.
Sticking to the manufacturer’s recommended supplies helps maintain consistent performance and prevents unnecessary maintenance costs.
Follow Printer Maintenance Alerts
Modern printers often display messages like “Clean Drum” or “Replace Drum Soon.” Ignoring these alerts can lead to worsening print quality or even permanent damage to the drum unit and other components.
Responding promptly to maintenance reminders ensures your printer stays in top condition and minimizes costly repairs later.
Conclusion
The printer drum unit might not be the most talked-about part of a printer, but its role is impossible to ignore. From transferring toner onto the page to ensuring sharp, clear prints, it directly influences every document your printer produces.
By understanding how the printer drum unit works, learning the signs of wear, and knowing when to replace or maintain it, you can avoid frustrating print issues and keep your printing costs under control. Whether you manage a small office printer or a high-volume business machine, proper care for your drum unit ensures professional results every time.
FAQs About Printer Drum Units
How often should I replace a printer drum unit?
It depends on your printer model and usage. Many drum units last through three to four toner cartridges before needing replacement. Always check your printer’s user manual for specific guidelines.
What happens if I keep using a worn-out drum unit?
Continuing to use a worn-out printer drum unit can lead to streaks, faded prints, and even damage to other printer components. It’s best to replace it once print quality starts declining.
Can I clean a printer drum unit instead of replacing it?
Yes, light cleaning can sometimes extend its life if the problem is minor debris. However, if the drum’s surface is scratched or the coating is worn out, replacement is the only solution.
How do I know if the problem is with the toner or the drum unit?
If prints are faded across the page, it might be the toner. But if you see streaks, lines, or repeated marks, the drum unit is usually the culprit. Some printers even provide on-screen error messages to guide you.
Are printer drum units universal across all printers?
No.


