
There’s a particular kind of frustration that only shows up when you’re in the middle of printing something important—a report due in ten minutes, shipping labels for customers waiting, or school assignments you promised to finish quickly. Everything feels normal until suddenly the printer stops pulling paper, the display freezes, and the screen flashes an error alerting you to a paper jam issue. For a moment, the room becomes unusually quiet, except for the soft hum of a machine that refuses to work. Most people experience this at least once, and it often leads to hurried pulling, shaking, or guessing. Unfortunately, those quick reactions usually make the jammed paper problem even worse.
A paper jam can happen to any model—inkjet, laser, or all-in-one—because every printer uses a similar mechanical path to feed sheets from the tray into the printing mechanism. When something interrupts that sequence, even slightly, the machine interprets it as a jam. Sometimes the jam is obvious: a crumpled sheet halfway inside the tray. Other times it’s hidden deep inside the rollers, stuck in a corner you didn’t know existed. This is exactly why learning how to fix paper jam in any printer the right way matters. Pulling without understanding the mechanism can damage sensors, scratch rollers, or bend internal gears.
Fixing a jam safely isn’t just about solving today’s error—it helps maintain printer health, prevents recurring failures, and avoids unnecessary repair costs. Many users underestimate how delicate the paper-feeding components are, especially when they try to forcefully remove stuck sheets. A careful, step-by-step approach is essential.
In this guide, you’ll learn not only how to fix paper jam in any printer, but also why jams happen, what each type of printer does differently, and how small habits—like paper storage and printer cleaning—can drastically reduce future problems. You’ll also discover basic printer troubleshooting basics that work across brands and models. By the end, you’ll understand the mechanics behind a jam and how to handle it confidently, safely, and efficiently. Whether you’re dealing with home printers, office laser machines, or multifunction devices, this tutorial gives you a clear and practical path to get your printer working again—without calling a technician.
Understanding Paper Jam in Any Printer
A paper jam might look like a simple mechanical error, but the causes behind it come from a combination of design, mechanics, and paper behavior. To truly master how to fix paper jam in any printer, it helps to understand how printers move paper, where the weak points are, and what signals the machine uses to detect problems. Every printer—from compact inkjet units to heavy-duty laser models—relies on a predictable series of actions. When that sequence is disrupted at any point, the device stops printing and displays an error to prevent further damage.
What Is a Paper Jam?
A paper jam occurs when a sheet fails to move smoothly through the paper path. This path includes several elements: the tray, feed rollers, separation pads, internal guides, and the output area. A jam can happen when a sheet misaligns, folds, stops moving, or gets caught between components. The printer interprets the interruption through sensors placed along the path, and once one of these sensors doesn’t detect the sheet where it should be, the printer halts the process immediately.
Why Paper Jams Happen in All Types of Printers
Even though printers come in various designs, the core printer mechanism is similar across models. The paper feeding process always relies on friction rollers that grab a single sheet at a time and guide it forward. When friction is uneven—either because the rollers are dirty, the sheet is curled, humidity changes the paper texture, or multiple sheets stick together—the feeding process fails.
Different printers experience jams for different reasons:
- Inkjet printers usually jam when the sheet absorbs moisture or when ink overspray accumulates on internal printer parts.
- Laser printers often jam at high-speed transfer points or near the hot fuser, where the toner bonds to the paper.
- All-in-one models with ADF may jam on the top feeder due to dust buildup or thin documents.
Understanding these differences helps in diagnosing and applying the correct solution when studying how to fix paper jam in any printer, because the removal steps depend heavily on where and how the jam occurs.
Inkjet vs. Laser: How Their Paper Paths Differ
Inkjet printers rely on a slower, more delicate feeding design. The rollers move the paper at a controlled pace, allowing ink to be sprayed accurately. Their paper feeding process requires clean, dry sheets—any moisture, curl, or thickness variation can prevent smooth movement.
Laser printers handle paper completely differently. They use high-speed rollers, static charge transfers, and a high-temperature fuser assembly. This means:
- Jam points are more common in the middle or back of the machine.
- Heat can cause curled or slightly damaged sheets to stick.
- Dust or toner residue increases friction.
Because the paths are different, jam removal also differs. An inkjet jam often requires checking the front path and roller entrance, while a laser jam commonly needs inspection near the fuser or rear door.
Common Signs Your Printer Is Experiencing a Paper Jam
Even before the error message appears, a few consistent indicators tell you something is wrong with the movement inside the machine:
- Strange noises — grinding, clicking, or repeated attempts to pull the sheet.
- Flashing or blinking indicators — especially on older models without display screens.
- Stop-and-start printing — the sheet moves slightly, pauses, then retracts or stops completely.
- Paper halfway inside the tray — visible but not moving.
- Crumpled or folded edges — suggesting misalignment inside the rollers.
- Multiple sheets pulled at once — a common sign of humidity or roller wear.
These symptoms are universal among printers, and recognizing them early helps prevent damage. When working through how to fix paper jam in any printer, identifying the symptom and the jam point is the first step to safely removing the stuck sheet.
Common Causes of Paper Jam
Paper jams rarely occur without a clear reason. Modern printers may use advanced sensors and smoother paper paths, but they can still be affected by environmental conditions, improper handling, and natural mechanical wear. Understanding these root causes helps users not only clear a jam but also prevent future issues. When people search for how to fix paper jam in any printer, identifying the source of the problem is often the key step they overlook.
Poor Paper Quality
One of the most common triggers of a paper jam is the use of low-quality paper. Cheaper sheets typically shed more fibers, curl easily, or absorb moisture quickly. Once the paper loses stiffness, the rollers struggle to grip and feed it evenly. This issue becomes even more noticeable when recycled or budget paper is stored in humid or uncontrolled environments.
Incorrect Paper Thickness
Paper thickness plays a crucial role in smooth printing. Paper that is too thin may crumple or buckle as it enters the rollers, while thicker paper may fail to align with the feed path. Many users accidentally load specialty media—such as glossy paper, photo paper, or cardstock—into a tray meant for standard weight paper. This mismatch often leads to jams at the very start of the paper path.
Worn or Dirty Printer Rollers
Printer rollers are responsible for picking up and guiding the paper through the machine. Over time, dust, toner residue, ink particles, and general wear reduce their grip. Worn rollers may pull multiple sheets, fail to pull any sheet at all, or feed the paper at an uneven angle. These roller problems are among the most common mechanical causes of persistent jams.
Overloading the Paper Tray
Filling the paper tray beyond its recommended limit is another frequent mistake. When too many sheets are packed tightly, the rollers and separation pad struggle to isolate a single sheet. This can cause two or more sheets to be pulled at once, creating an instant jam. Uneven stacks or mixing different paper types in a single tray can also disrupt smooth feeding.
Paper Misalignment
Paper that isn’t properly aligned inside the tray can easily jam the printer. Even slight crooked placement, bent edges, or sheets not seated against the guides may cause the paper to drift inside the machine and collide with internal components. Rushing through paper loading is a common cause of misalignment-related jams.
Environmental Factors
Humidity and temperature affect paper behavior more than many users realize. High humidity softens paper, causing it to warp or stick together. Very dry environments generate static electricity that makes sheets cling. Both conditions result in feeding inconsistencies that lead to jams. These issues are especially common in tropical climates or rooms without climate control.
Most paper jams stem from a combination of paper condition, mechanical wear, and environmental influence. Understanding these causes is essential before learning how to fix paper jam in any printer because the correct solution depends on addressing the root problem—not just removing the trapped sheet.
Step-by-Step: How To Fix Paper Jam In Any Printer
Fixing a paper jam becomes much easier once you understand how the paper path works. The goal is to remove the stuck sheet safely without damaging sensors, rollers, or internal components. Whether you’re working with an inkjet, laser printer, or multifunction unit, most models follow similar layouts. This makes the following steps reliable for nearly any printer you may be using. If you’re trying to master how to fix paper jam in any printer, this approach ensures you avoid unnecessary damage.
Perform a Safety Check
Always start by turning off the printer and unplugging the power cable. This prevents moving parts from accidentally engaging while you work. For laser printers, allow a few minutes for the fuser to cool down, as it becomes extremely hot during operation and can cause burns.
Inspect and Reset the Paper Tray
Remove the entire stack of paper from the tray. Fan or shake the stack gently to loosen sheets that may be sticking together. Look inside the tray area for partially fed sheets or torn fragments. Straighten and realign the paper stack before placing it back into the tray to ensure smoother feeding during the next print job.
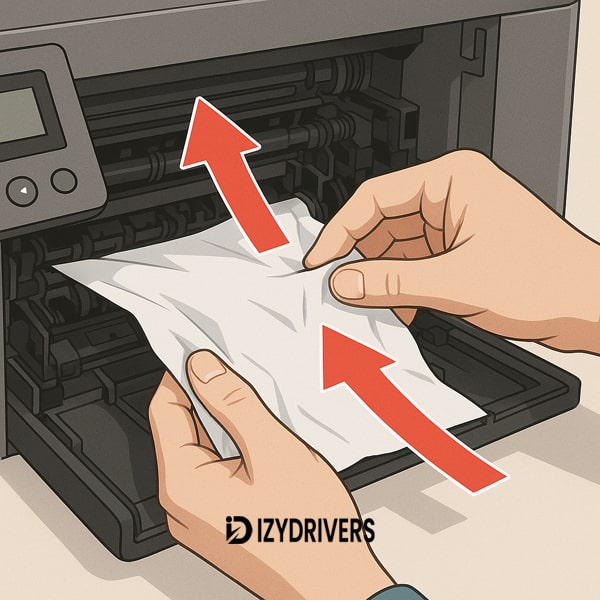
Check the Front Access Area
Open the front cover or output door and inspect for jammed sheets. If you see paper stuck in this area, pull it out slowly using both hands. Always pull in the direction the paper naturally feeds. Forcing the paper backward can damage rollers or misalign internal guides unless your printer manual explicitly allows it.
Remove Paper from the Rear Access Door
If the jam is not visible from the front, open the rear access panel. Many printers include this specifically for clearing jams. Removing the rear door gives you direct access to the roller system and mid-section of the paper path. Gently remove any jammed or partially fed sheets from this direction to avoid tearing.
Inspect the Fuser Area (Laser Printers)
For laser printers, jams often occur near the fuser—the component that applies heat to fuse toner onto paper. Carefully inspect this area if accessible. Remove any wrinkled or burnt pieces of paper, but avoid touching the fuser roller directly to prevent damage.
Look for Small Paper Fragments
Even tiny scraps can trigger jam sensors and cause continuous error messages. Use a flashlight to inspect corners, roller edges, and side guides. Removing these fragments helps prevent repeated jam warnings.
Restart the Printer
Close all access doors securely, reconnect the power cable, and turn the printer back on. Most printers will automatically reset their jam sensors during startup. If not, run a test print to confirm everything is working correctly.
Final Check
Following these steps ensures the jam is removed safely while minimizing the risk of harming internal components. This method forms the core foundation of how to fix paper jam in any printer, making it suitable for home, office, and multifunction printing devices.
Special Cases: Unique Paper Jam Problems in Different Printers
Paper jams don’t always happen for the same reason, and different printer types often present unique challenges depending on their design. When learning how to fix paper jam in any printer, it’s important to recognize that each machine—whether inkjet, laser, AIO, or models with advanced paper handling—may require a slightly different approach. Understanding these special cases helps users troubleshoot more effectively and avoid damaging sensitive components.
Inkjet Printers (HP, Canon, Epson, Brother)
Inkjet printers are known for their versatility, but they also deal with several jam-related issues that differ from laser machines. The most common problem is related to paper feed rollers becoming dirty from dried ink or dust accumulation. When this happens, the rollers lose grip and fail to pull a sheet consistently, often creating partial feeds or crooked entry jams.
Another inkjet-specific issue involves the carriage path. Sometimes a small piece of paper from a previous jam gets stuck near the printhead carriage rails. When the printhead moves, it collides with the debris, causing the printer to freeze mid-operation. Clearing this requires opening the top cover, manually sliding the carriage, and checking for hidden scraps.
Certain Epson and Canon models also face issues with rear-feed paper paths. These paths are more sensitive to paper thickness, making jams more likely when users insert textured or glossy media. When understanding how to fix paper jam in any printer, these rear-feed setups require gentler handling and careful inspection behind the loading slot.
Laser Printers
Laser printers have a different internal structure, and because of their high heat and fast feeding mechanisms, they tend to suffer from more specialized jam situations. One of the most notable is a laserjet fuser jam, which happens when the paper gets stuck inside the heated fuser assembly. The sheet might wrinkle, scorch slightly, or even stick to the roller surface. Clearing a jam here requires extra caution, as the fuser remains extremely hot for several minutes after printing.
Laser models also commonly jam near registration rollers—components that align the sheet before printing. Dust or worn-out rubber leads to misalignment, causing the paper to fold or crumple before reaching the toner unit.
Another common case is debris buildup from toner fallout. Small toner particles can accumulate on internal sensors, causing the printer to falsely detect a jam even when no sheet is stuck. Light cleaning usually resolves this, reinforcing the importance of regular maintenance when learning how to fix paper jam in any printer.
All-in-One Printers with ADF
All-in-one printers equipped with an Automatic Document Feeder (ADF) offer convenient scanning, but the ADF introduces its own jam problems. An ADF jam often occurs when the feeder pulls multiple pages at once or when documents are inserted with bent edges. Unlike standard printing jams, ADF jams require clearing both the top document path and the feeding roller inside the scanner lid.
The ADF also uses smaller, more delicate rollers. When these rollers become worn, they struggle to grip smooth paper, especially thin copy paper. Clearing an ADF jam typically involves removing the document stack, lifting the scanner cover, checking for jammed sheets, and wiping the rollers with a slightly damp cloth.
Some AIO printers also experience jams where the document exits, especially if the output tray is full or obstructed. These issues highlight why multifunction devices require additional awareness beyond standard printing instructions.
Duplex Printing Jam Issues
Duplexers—components that flip the paper for double-sided printing—are another frequent source of jams. A duplexer jam often occurs when the sheet is too thick, slightly curled, or carries leftover moisture. As the printer reverses the paper, curled edges catch on the narrow internal path, stopping the print job.
Another issue arises when dust or debris settles inside the duplexer’s turning mechanism. This interferes with sensors that monitor paper movement, causing the machine to halt mid-flip.
To properly understand how to fix paper jam in any printer, duplex units should always be inspected from both sides:
- the rear panel where the sheet re-enters the path
- the internal flip mechanism near the roller assembly
Clearing these jams requires patience since duplex paths are narrower and more sensitive than the main feed route.
Preventing Future Paper Jams
While knowing how to fix paper jam in any printer is important, preventing jams from happening in the first place is even more valuable. Consistent habits—like using the right paper, maintaining the rollers, and following proper storage practices—make a dramatic difference in long-term reliability. These preventative steps incorporate essential LSI factors such as keeping the printer clean, selecting recommended paper, and adopting useful printer maintenance tips.
Use High-Quality Paper
High-quality paper offers consistent thickness, smoother surfaces, and better moisture resistance. Cheap paper tends to shed fibers, leading to buildup inside the machine. This buildup affects rollers and contributes to future jams. Premium paper also reduces static, which helps prevent sheets from sticking together. Choosing manufacturer-recommended paper is one of the simplest ways to prevent printer jam issues.
Set Up the Paper Tray Properly
Proper tray setup is crucial. Always tap the stack to align the edges before loading it into the tray. Make sure the paper guides are snug but not too tight. Avoid mixing different paper weights or textures within the same tray, as these inconsistencies disrupt the feeding process. Keeping the tray at the correct capacity also prevents multiple sheets from being pulled at once.
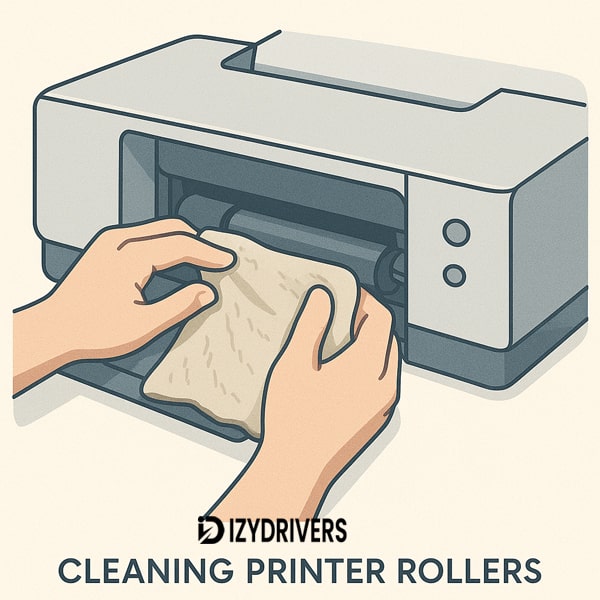
Clean the Rollers Regularly
Dirty or worn rollers are among the most common causes of chronic jams. Regular cleaning helps maintain good grip and smooth feeding. Use a lint-free cloth slightly dampened with water or isopropyl alcohol to wipe the roller surfaces. This simple maintenance task extends the life of the machine and supports long-term reliability. It’s a core part of preventing jams even after you learn how to fix paper jam in any printer.
Store Your Paper Properly
Paper absorbs moisture easily, especially in humid environments. Store your paper in a cool, dry place and keep it sealed until use. If the paper has been exposed to humidity, fan the stack before loading it into the tray. Proper storage prevents curling, sticking, and inconsistent feeding—all major contributors to jams.
Update Printer Firmware
Many modern printers include firmware updates that improve paper handling, sensor accuracy, and roller calibration. Keeping your firmware updated ensures smooth performance and reduces the likelihood of false jam errors. Updates also introduce improvements for new paper types or media handling behaviors.
Follow a Regular Maintenance Schedule
A consistent maintenance routine is essential. This includes cleaning sensors, checking for debris, inspecting rollers, and reviewing the paper path. If you use your printer frequently, schedule maintenance monthly. For light use, every two to three months is usually sufficient. These habits reinforce everything you’ve learned about how to fix paper jam in any printer by ensuring issues don’t accumulate over time.
Troubleshooting Persistent Paper Jams
Even after you learn how to fix paper jam in any printer, some machines continue showing errors or jamming repeatedly. Persistent jams usually indicate deeper issues involving sensors, rollers, or internal hardware. Understanding these problems helps you diagnose the root cause and restore normal operation. This section covers the most common scenarios users face when the printer keeps jamming, including ghost errors, stuck sensors, and mechanical failures.
Error Won’t Clear After Removing the Paper
Sometimes printers continue displaying a jam alert even though every visible sheet has already been removed. This issue is known as a ghost paper jam. It happens when tiny scraps remain inside the paper path or when a sensor detects an obstruction that isn’t there.
Start by turning off the printer and unplugging it. Open every accessible compartment—front door, rear access panel, duplexer, and output tray. Use a flashlight to inspect corners for small fragments. Clearing these leftovers is essential for understanding how to fix paper jam in any printer that repeatedly flags false alerts.
If the error persists, the internal sensors may need cleaning. Dust, toner residue, or fibers near optical sensors can trick the printer into thinking a sheet is still inside.
Rollers Not Pulling Paper
When rollers fail to pull paper from the tray, the printer may repeatedly attempt to feed sheets without success. This issue often stems from worn-out or slippery rollers. Over time, rubber rollers lose grip due to dust, oils, or natural wear.
Try cleaning the rollers with a lint-free cloth slightly dampened with water or isopropyl alcohol. Rotate the rollers manually as you clean to ensure all sides are treated. If the rollers are cracked, glossy, or uneven, replacement may be necessary. This step is crucial for users learning how to fix paper jam in any printer that fails to feed sheets consistently.
Dirty or Faulty Sensors
Sensors play a major role in detecting paper movement. When sensors become dirty or misaligned, the printer may stop mid-print, report inaccurate jam warnings, or refuse to start a job altogether. Sensor issues are more frequent in laser printers due to toner dust accumulation.
Clean the sensor area gently using compressed air or a soft brush. Avoid touching internal electronics directly. If a sensor is damaged or loose, the printer may require professional servicing. Understanding the health of these sensors is part of mastering how to fix paper jam in any printer experiencing recurring errors.
ADF Still Jamming Frequently
Automatic Document Feeders (ADF) have their own jam-related problems that can persist even after clearing the path. ADF rollers are smaller, more delicate, and more sensitive to dust. Misfeeds often happen when documents have bent corners, sticky surfaces, or mixed sizes.
Open the ADF lid and inspect the feeder path. Remove any debris and wipe the rollers gently. Make sure the document guides are aligned properly. If the ADF keeps jamming despite correct handling, the pickup rollers may need replacement. This is especially common in multifunction office printers with heavy daily usage.
Understanding these persistent issues ensures you can go beyond the basics of how to fix paper jam in any printer and address deeper mechanical or sensor-based problems.
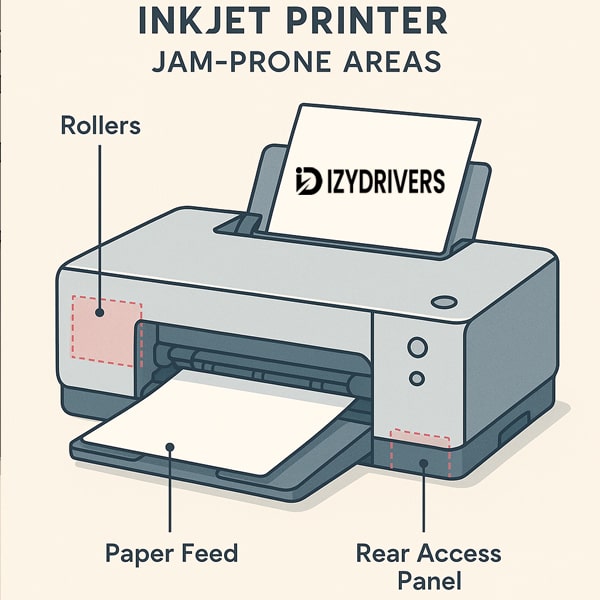
Comparison Printer Types & Their Common Jam Points
Different printers have different mechanical layouts, which means their jam-prone areas also vary. By comparing these models, users get a clearer understanding of where jams commonly occur and how to fix paper jam in any printer based on its design.
Below is a simplified overview:
| Printer Type | Common Jam Points | Characteristics |
|---|---|---|
| Inkjet Printer | Rear feed slot, front rollers, carriage path | Sensitive to paper type; jams often caused by curled or glossy sheets; debris near the printhead path. |
| Laser Printer | Fuser unit, registration rollers, output path | High heat and fast feeding; prone to fuser jams and toner debris affecting sensors. |
| ADF (Automatic Document Feeder) | Entry rollers, document exit path, internal feed rollers | Jams caused by bent documents, mixed page sizes, or worn small rollers. |
| Duplexer | Reversing path, flip mechanism, rear rollers | Narrow paper paths make curled or thick paper jam easily during two-sided printing. |
Conclusion
Paper jams are one of the most common printing problems, but they don’t have to disrupt your workflow for long. By understanding why jams happen, what causes them, and how each printer type behaves differently, you’re far better prepared to handle the issue safely. Whether you’re dealing with a simple misfeed or a more complicated jam in the fuser, knowing how to fix paper jam in any printer equips you with the confidence to restore your device quickly.
Removing a jam correctly is not just about pulling out stuck paper—it’s about preventing further damage. Safe handling protects your rollers, sensors, and internal components while ensuring the machine can return to normal operation. Most importantly, these steps help you avoid making the problem worse.
Once you understand the paper path, recognize warning signs, and follow best practices for maintenance and paper storage, you dramatically lower the risk of future jams. Ultimately, mastering how to fix paper jam in any printer allows you to keep your device running smoothly, extend its lifespan, and maintain consistent print quality over time.
FAQs About Paper Jam In Any Printer
What should I do if the paper tears during removal?
If the paper tears while you’re removing it, start by turning off the printer and unplugging it. Carefully inspect the entire paper path—front access door, rear panel, and duplexer section. Torn paper removal must be thorough because even tiny scraps can block sensors and trigger repeated jam errors. Use a flashlight to check corners and roller gaps, and remove every fragment before restarting the printer.
Why does my printer show a paper jam when nothing is stuck?
This is often called a ghost paper jam, and it happens when sensors detect leftover fibers, dust, or small debris even though no visible sheet is inside. The error persists because the sensor beam is still blocked. Clean the sensor areas gently using compressed air or a soft brush. If the issue continues, the sensor may be misaligned or faulty. Understanding how to fix paper jam in any printer includes learning how to identify and reset these false alerts.
How do I prevent frequent paper jams?
Frequent jams usually point to poor paper quality, worn rollers, or improper paper storage. Use high-quality paper, keep sheets dry, align the stack before placing it in the tray, and avoid overloading. Regular maintenance—cleaning rollers, sensors, and internal paths—also plays a major role. These steps form the foundation of long-term reliability and help reduce recurring jam issues.
Is it safe to pull jammed paper backward?
Generally, no. Pulling paper backward goes against the natural paper path and can damage rollers, stretch internal guides, or dislodge sensors. Safe backward pulling is only allowed if your printer manual specifically instructs it. The safest approach is to pull the sheet in the direction it normally travels. This reduces strain on moving parts and prevents misalignment inside the machine.
Do different printers have different jam points?
Yes. Inkjet printers often jam at the rear feed or carriage path, laser printers commonly jam near the fuser, ADF units jam at the entry rollers, and duplexers jam inside the reversing mechanism. Each model has unique pinch points based on its design. This is why knowing how to fix paper jam in any printer means understanding which components are most likely to cause issues in the device you’re using.


