
Printing often looks simple on the surface. A file goes to the printer, paper comes out, and the image appears. The real process is far more complex. One of the most important concepts behind printed images is dpi in printing, a measurement that controls how detailed a print can look on paper.
Resolution plays a major role in printed output. Images that appear clean on a computer monitor may look very different once they are printed. A photo with poor resolution can turn into a soft or blocky result, while a properly prepared file produces strong print quality and clear visual detail.
A quick example shows the difference easily. Imagine printing the same photograph in two versions. One version contains high resolution and dense dots, producing strong image sharpness. The second version contains fewer dots, which leads to rough edges and missing image detail. The result often appears dull or slightly distorted.
Another factor is the difference between screen viewing and paper output. Screens display images using pixels, while printers build images with tiny ink dots measured in dots per inch. This difference explains why some graphics look perfect on a monitor yet produce disappointing results when printed.
Understanding DPI in Printing
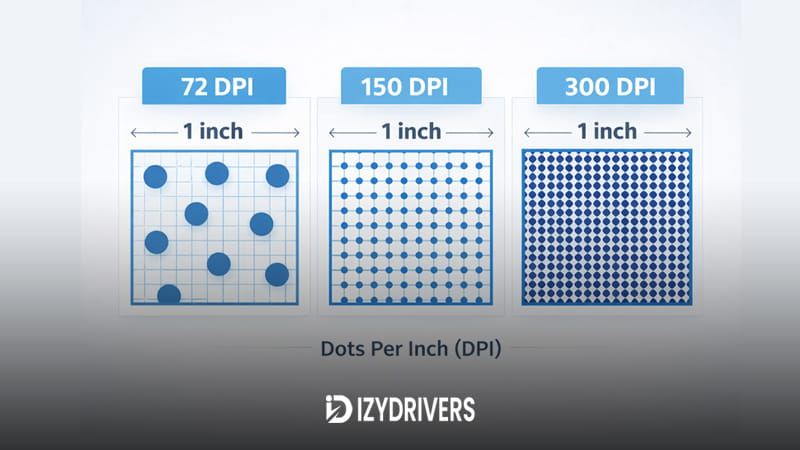
The concept of dpi in printing describes how many tiny ink dots a printer places within one inch of paper. Each dot contributes to the final image. When many dots are placed close together, the printer creates smoother shapes, cleaner lines, and stronger image detail.
The term dots per inch directly describes the density of printed dots. A printer with 300 DPI produces three hundred ink dots across one inch of paper. Higher values increase printing resolution, allowing the printer to recreate small textures, fine lines, and complex image structures.
Every printed image is built from thousands or even millions of microscopic dots. These dots combine to create shades, edges, and textures. The closer the dots sit to each other, the smoother the final result appears. This density is often called printer dot density, which directly affects visual accuracy.
The printer does not place dots randomly. Each dot follows precise positioning rules controlled by the printing system. This process is known as ink dot placement, and it determines how colors blend together to form gradients, shadows, and highlights.
When dpi in printing increases, the printer gains more control over how each section of the image appears. Higher density allows more subtle adjustments in shading, which improves the depth and realism of printed graphics. Low density limits that control, leading to rough edges or missing texture.
For photographs and detailed graphics, high printing resolution plays an important role. Fine textures such as hair, fabric patterns, or small typography rely on dense dot placement. Without enough dots, those features can appear soft or broken.
Knowing how dpi in printing works also explains why some printers produce sharper results than others. Hardware limitations determine how accurately a printer controls dot placement. Better equipment often delivers higher printer dot density, which improves overall output quality.
What Does DPI Mean in Printing
The phrase dots per inch describes how tightly ink dots are packed onto paper. Each dot represents a tiny point of color that contributes to the final image.
When the number of dots increases, shapes become smoother and edges look cleaner. This relationship explains why dpi in printing strongly affects visual precision. Higher density improves how small details appear across photographs, graphics, and printed text.
How DPI Works in Printing Technology
Printers use specialized systems to control dot placement during printing. In inkjet printing technology, the printer sprays microscopic droplets of ink onto the paper surface. These droplets form patterns that combine into visible images.
Laser printers follow a different method. Their system uses electrostatic charges and toner powder to build images with high accuracy. This approach influences laser printer resolution, which determines how many dots can appear within one inch.
Both technologies rely on careful printer dot placement to build images. The ability to control those dots defines how strong the final dpi in printing performance becomes.
Why DPI Matters for Print Quality
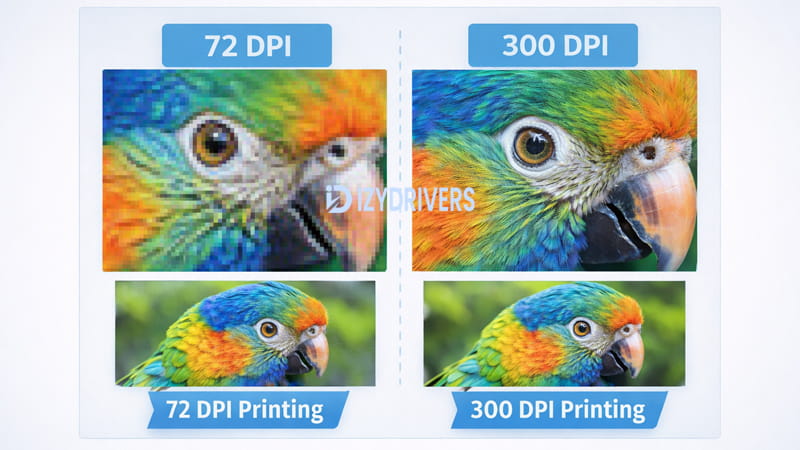
The value of dpi in printing becomes clear when comparing different print results. A file printed at low resolution often appears dull or rough, while the same image printed at higher density shows stronger image clarity and improved detail.
Every printed picture contains thousands of individual dots. When those dots sit far apart, the printer struggles to represent subtle features. This limitation lowers the overall print detail level, especially in complex images such as portraits or landscapes.
Higher dpi in printing allows the printer to distribute more dots across the same surface area. This additional density improves how shapes blend together, producing smoother transitions and stronger edges. As a result, images gain better definition and more realistic depth.
Professional printing environments rely heavily on high resolution printing to maintain quality standards. Designers preparing marketing materials, brochures, or photo prints often select higher DPI values to preserve clarity in every section of the image.
Color transitions also depend on resolution. A photo containing soft shadows or complex lighting requires many dots to reproduce smooth gradients. Limited resolution can create visible steps between color tones, which reduces realism.
Printers with stronger dpi in printing capabilities handle these gradients far more effectively. Additional dot density allows colors to blend gradually, creating balanced shading across the entire image.
How DPI Affects Image Detail
Small visual features depend heavily on dot density. Tiny elements such as eyelashes, hair strands, or fine textures require precise ink placement.
Higher dpi in printing increases the number of dots available to recreate those features. With more dots forming the structure, photographs retain sharper outlines and stronger visual depth.
When resolution drops too low, fine objects begin to disappear. The printer lacks enough dots to recreate those details accurately.
DPI and Color Gradients
Smooth color transitions rely on extremely precise dot placement. A printer with strong resolution distributes dots gradually across different shades.
This method supports color gradient printing, which allows images to shift naturally between tones. The effect becomes especially important in photographs that contain shadows, skies, or soft lighting.
Higher dpi in printing supports better blending between colors. The additional dots allow subtle adjustments in tone, producing balanced gradients and stronger visual realism.
Low DPI vs High DPI Printing
Low resolution printing often leads to visible quality problems. Images may show jagged edges or uneven shading. In extreme cases, the result produces pixelated images that appear rough and unrefined.
High resolution printing produces a much smoother appearance. Dense dot placement supports clean edges, balanced shading, and strong print detail.
The difference becomes even more visible in photographs or marketing materials. Low resolution can produce blurry prints, while higher density maintains clear lines and professional presentation.
| DPI Level | Print Quality | Typical Use |
|---|---|---|
| 72 DPI | Low detail, pixelated | Web images |
| 150 DPI | Moderate quality | Draft printing |
| 300 DPI | High quality | Photos and documents |
| 600+ DPI | Ultra sharp | Professional printing |
This comparison highlights the importance of dpi in printing. Resolution directly shapes how clean, detailed, and realistic a printed image appears.
DPI vs PPI: Understanding the Difference

Many people mix up printer resolution terms. One of the most common mistakes involves dpi in printing and PPI. Both measurements relate to image clarity, yet they describe different stages of the visual process.
Confusion often starts when preparing images for printing. A graphic may look sharp on a monitor, yet the printed result appears soft or slightly distorted. This situation usually happens when users misunderstand the difference between printer output resolution and the digital resolution of an image.
Screens display images using pixels. Printers recreate those images using tiny ink dots placed on paper. These two systems follow separate measurement methods. PPI measures pixel density on screens, while dpi in printing describes the number of ink dots produced by a printer.
When preparing images for paper output, both measurements must work together. A file with poor raster image resolution cannot produce strong print detail, even if the printer supports high DPI settings. The digital source still determines how much visual information is available.
Many beginners assume that increasing printer settings alone will improve the final result. In reality, the file must contain enough data to support the printer’s output capability. Without strong image resolution for printing, the printer simply reproduces the same low-detail image with additional dots.
Recognizing this difference prevents many printing issues. Designers and photographers rely on accurate pixel density in the source file while selecting proper dpi in printing settings during output. This balanced approach ensures that both the digital file and the printer contribute to the final image quality.
What Is PPI
PPI stands for pixels per inch, a measurement used for digital displays and image files. It describes how many pixels appear within a single inch of screen space.
Each pixel represents a tiny square of color that forms part of a larger image. When the number of pixels increases within the same area, the image gains stronger digital resolution and smoother visual detail.
Image files rely heavily on pixel density. Photographs captured by cameras or created in graphic software contain thousands or millions of pixels. These pixels define the available raster image resolution, which later influences the printed output.
Higher pixel density allows images to retain strong structure during printing. When pixel density remains low, the image may appear stretched or blurred after the printer translates pixels into ink dots.
How DPI and PPI Work Together
Printing begins with a digital file. That file contains pixels arranged according to the image’s pixels per inch value. The printer then converts those pixels into physical ink dots.
This conversion links digital images with printer hardware. The printer analyzes the pixel information and recreates it through precise dot placement. That process connects the digital file with the printer’s dpi in printing capability.
When both measurements align correctly, the printer reproduces images with high accuracy. The pixel structure provides the visual blueprint, while the printer translates that structure into physical marks on paper.
Strong alignment between PPI and dpi in printing produces balanced output. Images maintain their structure, colors appear smoother, and visual textures remain intact during printing.
Why the Difference Matters in Printing
Misunderstanding resolution terms can easily reduce print quality. Many users attempt to fix blurry results by adjusting printer settings alone.
In reality, the problem often begins with the image file itself. A file with weak digital resolution contains limited pixel data. Increasing dpi in printing will not restore details that never existed in the original image.
Another common mistake involves enlarging low-resolution images. When an image expands beyond its original pixel structure, the printer attempts to stretch that information across a larger surface. The result frequently produces soft edges or rough shapes.
Correct resolution management requires attention to both digital and physical output settings. The source file must provide sufficient image resolution for printing, while the printer must support the required dpi in printing value.
| Term | Meaning | Used For |
|---|---|---|
| DPI | Dots per inch | Printer output |
| PPI | Pixels per inch | Digital images |
| LPI | Lines per inch | Professional printing |
Why 300 DPI Is the Standard for Printing
Among various resolution settings, 300 DPI stands out as the most widely accepted benchmark for high-quality printing. Many printers and design workflows rely on this level to produce clean, detailed images suitable for professional output.
The reason lies in the balance between detail and efficiency. 300 dpi printing provides enough dot density to recreate fine textures while remaining practical for most consumer and commercial printers.
At this level, printed photographs maintain crisp edges, smooth shading, and accurate color transitions. These qualities contribute to professional print quality, which is essential for magazines, brochures, and photo prints.
Lower resolution settings can still work for drafts or large-format materials viewed from a distance. However, documents designed for close viewing benefit from higher density. More dots allow the printer to reproduce subtle details in text and graphics.
Another factor involves the physical limitations of human vision. At common viewing distances, most people cannot distinguish individual ink dots once density approaches 300 per inch. This characteristic allows prints to appear smooth and continuous.
Printers capable of high resolution printing may exceed this value, reaching 600 DPI or higher. These devices offer additional refinement for specialized tasks such as photographic printing or detailed design work.
Still, 300 DPI remains the most practical baseline for everyday professional output. It provides consistent clarity while maintaining manageable file sizes and printing speed.
Industry Standard for Print Resolution
The printing industry often relies on 300 DPI as a reliable resolution benchmark. Designers preparing marketing materials, magazines, and photographs commonly use this setting during export and printing preparation.
According to guidelines referenced by Adobe, 300 dpi printing is widely considered the standard resolution for high-quality printing because it provides enough detail for images and text to appear crisp and professional on paper.
This recommendation reflects years of printing practice. The resolution offers strong visual accuracy while remaining compatible with most commercial printers.
During professional production workflows, images prepared for dpi in printing at this level maintain strong structure and clarity. The result supports consistent professional print quality across many types of printed materials.
Human Eye and Print Detail
Human vision plays a major role in determining practical resolution limits. Once dot density becomes extremely high, individual dots blend together and appear as continuous shapes.
Based on technical documentation from Lenovo, when resolution reaches around 300 dots per inch, individual dots become difficult for the human eye to distinguish at normal viewing distances, resulting in smoother and clearer prints.
This visual limitation explains why 300 dpi printing produces such convincing results. The dot structure becomes nearly invisible, allowing images to appear natural and fluid.
Printers that support higher settings may improve certain edge cases, yet the visual difference often becomes subtle for typical viewing conditions.
For everyday projects that rely on dpi in printing, the 300 DPI benchmark remains a reliable choice for balancing clarity, efficiency, and consistent output quality.
Best DPI for Different Types of Printing
Printing projects vary widely. Photographs, documents, posters, and banners all follow different resolution requirements. Selecting the correct dpi in printing ensures that each project maintains appropriate visual quality.
The ideal resolution depends on two major factors: viewing distance and image complexity. Projects viewed up close require higher density, while large graphics seen from far away can use lower values.
Clear knowledge of these differences helps users select the best dpi for printing in each situation. The correct resolution prevents blurry images while avoiding unnecessarily large file sizes.
Many designers rely on recommended dpi guidelines when preparing print files. These standards provide a practical balance between image clarity and printing efficiency.
DPI for Photo Printing
Photographs contain intricate textures and complex lighting transitions. Skin tones, shadows, and fine patterns rely on dense dot placement for accurate reproduction.
For this reason, most photo prints use dpi for photos set around 300 DPI. This resolution preserves detailed features while maintaining smooth gradients.
Professional photo labs and home photo printers both rely on strong dpi in printing values to reproduce natural image depth. High resolution ensures that subtle textures remain visible across the printed surface.
DPI for Documents
Printed documents often contain text, diagrams, and simple graphics. Even small fonts require clear edges to remain readable.
Documents generally follow recommended dpi guidelines near 300 DPI. This setting ensures that characters remain sharp and consistent across the page.
Clear typography plays a major role in document readability. Adequate dpi in printing allows printers to reproduce crisp letterforms without jagged edges or faded strokes.
DPI for Posters and Large Prints
Large graphics follow slightly different rules. Posters and banners often appear in wide spaces such as walls, event displays, or advertising panels.
Since viewers usually stand several feet away, the eye cannot detect extremely fine detail. This distance allows lower dpi for posters settings while still producing acceptable visual quality.
Designers often select moderate resolution values to reduce file size and printing time. Even at lower density, well-prepared files still maintain solid visual impact.
| Printing Type | Recommended DPI |
|---|---|
| Photos | 300 DPI |
| Documents | 300 DPI |
| Posters | 150–300 DPI |
| Banners | 72–150 DPI |
Selecting the proper dpi in printing ensures that each project matches its intended viewing conditions. Higher resolution supports close viewing, while moderate density works well for large displays seen from a distance.
How to Check the DPI of an Image
Image resolution plays a major role in the final quality of printed graphics. Before sending a file to a printer, it is important to confirm the actual resolution stored in the image. This process helps determine whether the file contains enough detail for clear printing.
Many users skip this step and only adjust printer settings. The result often leads to disappointing output. A printer cannot create missing information that does not exist in the original file. Checking the dpi in printing value of an image prevents these issues and ensures the file meets the requirements for high-quality output.
The easiest way to check image resolution is through built-in system tools or image editing software. Most operating systems allow users to view the image properties of a file, which includes important details such as dimensions and resolution.
Resolution information normally appears in the resolution settings section of the file properties panel. This section shows how many dots or pixels are assigned to each inch of the image.
When reviewing resolution, users should also consider the intended print size. An image may contain a high DPI value but still appear low quality if stretched too large. Matching resolution with the final print size helps maintain proper dpi in printing standards.
Checking DPI on Windows
Windows includes a simple method for reviewing image resolution. Start by locating the image file in File Explorer.
Right-click the image and select Properties. A window will appear with several tabs. Navigate to the Details tab to view technical information about the image.
Inside this section, users can see the horizontal and vertical resolution values. These values reveal the density used when preparing the image for dpi in printing.
This panel also displays image dimensions and other technical information. Reviewing the image properties helps confirm whether the file contains sufficient detail for the intended print project.
Checking DPI on Mac
Mac computers provide a similar method for reviewing image resolution. The built-in Preview application includes tools that display image information.
Open the image in Preview and select Tools, then choose Show Inspector. A panel will appear with multiple tabs containing image information.
Within this window, users can review the resolution section. These resolution settings indicate how the image is prepared for printing.
Mac users can also adjust print size directly in Preview. Changing dimensions may influence the effective dpi in printing, so it is helpful to confirm the value before sending the image to a printer.
Checking DPI in Image Editing Software
Professional editing software provides the most detailed view of image resolution. Programs such as Photoshop and Canva display resolution information during editing and export.
In Photoshop, the resolution value appears inside the Image Size dialog. This panel allows users to check image resolution, modify dimensions, and perform advanced adjustments.
Canva also shows resolution information when exporting files. Selecting a high-quality export option helps maintain proper dpi in printing for documents and graphics.
Image editing software offers additional tools for controlling output quality. These tools help ensure that files maintain correct resolution before entering the printing process.
How to Change or Increase DPI for Printing
Occasionally an image may contain insufficient resolution for printing. When this happens, users may need to modify the file before sending it to the printer. Adjusting the resolution helps align the image with proper dpi in printing standards.
Changing resolution often involves resizing the image or adjusting its pixel density. Many editing programs include tools designed for resolution adjustment, allowing users to modify DPI without dramatically altering the image dimensions.
However, increasing resolution does not always improve image quality. When new pixels are artificially added, the software must estimate how the image should look. This process can sometimes produce soft edges or slight artifacts.
For this reason, the difference between raster vs vector images becomes important. Raster images rely on fixed pixels, while vector graphics use mathematical shapes that scale without losing clarity.
Another method involves controlled image scaling. By resizing an image carefully while maintaining its pixel structure, users can sometimes improve its suitability for printing.
These techniques help align the image file with the required dpi in printing settings before output begins.
Changing DPI in Image Editing Software
Image editing software provides the most precise control over resolution. Programs such as Photoshop allow users to adjust DPI directly through the image size settings.
Inside the image size panel, users can modify the resolution field while maintaining the same pixel dimensions. This process performs a controlled resolution adjustment without drastically changing the image size.
Some software includes advanced resampling methods. These algorithms estimate new pixel values during image scaling, which can improve results when increasing resolution.
Adjusting settings carefully helps maintain consistent dpi in printing values across the final output file.
Increasing DPI Without Losing Quality
Increasing resolution while preserving image clarity requires careful handling. Not all files respond well to resolution changes.
A low-quality image cannot magically gain detail through software adjustments. However, certain techniques can minimize visible loss during the process.
Using higher-quality source files remains the most reliable solution.
Using Vector Graphics
Vector graphics rely on mathematical shapes rather than fixed pixels. This structure allows the image to scale freely without losing detail.
Design elements such as logos, icons, and diagrams often use vector formats. These files maintain clarity regardless of output size or dpi in printing requirements.
When preparing graphics for printing, vector formats offer excellent flexibility.
Using High Resolution Images
Starting with high-resolution images greatly simplifies the printing workflow. Photographs captured at large sizes contain enough detail to support various print formats.
High-quality images allow designers to perform moderate image scaling while maintaining strong visual structure. This flexibility ensures that the final file meets the necessary dpi in printing standards.
Common Printing Problems Related to DPI
Many printing problems originate from incorrect resolution settings. When images lack sufficient detail, the printed output may appear distorted or unclear.
One of the most common issues involves low resolution printing, which occurs when a file does not contain enough detail for the intended print size.
Another frequent issue appears when users enlarge small images. Increasing size without adding real detail stretches the existing pixels, creating visible artifacts.
Blurry Prints
Blurry images appear when the printer cannot reproduce clear edges. This problem often occurs when the image lacks sufficient resolution for the chosen print size.
Low pixel density forces the printer to stretch available data. The result often produces blurry printing, where fine details disappear.
Maintaining proper dpi in printing values helps prevent this issue and ensures sharper image edges.
Pixelated Images
Pixelation appears when individual pixels become visible within the printed image. Instead of smooth shapes, the output displays blocky patterns.
This problem commonly occurs in graphics prepared for screens rather than paper. Web images with low resolution frequently produce pixelated images when printed.
Increasing source resolution before printing helps maintain consistent dpi in printing levels and reduces this problem.
Image Looks Good on Screen but Bad in Print
A common frustration occurs when images look perfect on a monitor but appear poor once printed.
Screens display images using pixels, and monitors often hide minor resolution problems. When the same file enters the printing process, the printer exposes weaknesses in the image structure.
This situation usually results from low resolution printing combined with improper scaling. Checking file resolution before printing ensures the image contains enough detail to support proper dpi in printing output.
DPI in Different Types of Printers
Printers vary widely in their resolution capabilities. Hardware design, printing technology, and intended usage all influence how a device handles resolution.
Different printers use different printer resolution settings, which determine how many dots can appear in each inch of printed output.
Some printers focus on speed and efficiency, while others prioritize detail and photographic accuracy. . These differences help users choose the right device for their printing needs.
Inkjet Printer DPI
Inkjet printers create images by spraying tiny droplets of ink onto paper. This method allows for precise color blending and strong visual detail.
Many modern devices support high inkjet printer dpi, making them suitable for photo printing and graphics work.
Inkjet technology can produce smooth gradients and accurate color transitions when paired with strong dpi in printing settings.
Laser Printer DPI
Laser printers rely on toner powder and electrostatic charges to create images. This method produces sharp text and consistent graphics.
High laser printer dpi values help maintain clean typography and precise line work.
Laser printers are widely used for office printing where speed and clarity are essential.
Photo Printer Resolution
Photo printers specialize in producing highly detailed photographic prints. These devices often include advanced color systems and improved photo printer resolution capabilities.
Their design focuses on accurate color reproduction and smooth tonal transitions.
High-end photo printers often support extremely detailed dpi in printing settings, allowing them to reproduce fine textures and subtle lighting variations found in professional photography.
Conclusion
Resolution plays a critical role in determining how printed images appear on paper. The concept of dpi in printing explains how printers recreate digital graphics using thousands of microscopic dots.
Higher resolution values allow printers to reproduce sharper edges, smoother color transitions, and stronger visual detail. Files prepared with proper resolution maintain clarity during the printing process.
Choosing the correct dpi in printing setting depends on the type of project, viewing distance, and printer capability. Photographs and documents usually benefit from higher density, while large graphics can use moderate resolution.
Checking image resolution before printing prevents many common problems such as blurry images or pixelation. Combined with proper file preparation, correct resolution settings help ensure consistent and professional print results.
FAQs About DPI in Printing
What is DPI in printing
DPI in printing refers to the number of ink dots a printer places within one inch of paper. Higher values increase image detail and improve overall print clarity.
Is 300 DPI always necessary
Not every project requires extremely high resolution. Standard documents and photographs often benefit from 300 DPI, while large banners may use lower values due to viewing distance.
Can you increase DPI without losing quality
Increasing resolution works best when starting with high-quality images. Files with limited detail may not improve significantly during resolution changes.
What happens if DPI is too low
Low resolution can lead to blurry printing, visible pixel patterns, and reduced image clarity.
Is DPI the same as PPI
No. PPI measures pixel density in digital images, while dpi in printing describes how many ink dots a printer produces on paper.


